Tuesday, May 26, 2015
Looking up and kneeling down
A 3 day weekend.
We pick up the action right where we left off, working on the ceiling beams. There was still a bit of paint stripping and wood filler work to do so we got right on that. While the paint stripper worked it’s magic, Genny started sanding down all the filler and basically smoothing out the beams. Then the ceiling got a final cleaning with Murphy’s Oil soap. We blue-taped the ceiling & walls and put the first (primer) coat of paint on the beams. Even with just primer, they look so much better. That, along with some time visiting took a whole day. It doesn’t sound like much when written out like this. Of course we also hung the new ceiling fan (sans blades). Yeah, that’s what took all the time.
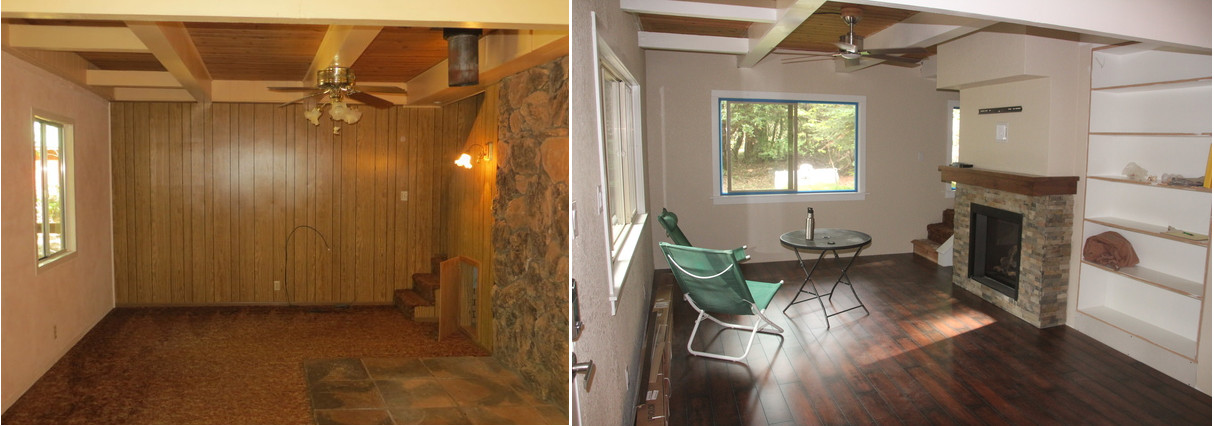
The next morning a fresh coat of white trim paint was applied to the beams and now it looks really good. After lunch, the masking tape comes down, and a bit of touch up and the ceiling is done (by some definition of done anyway, there’s still some caulking to do). We start the afternoon with a new project, the floor. After a couple of false starts we get the first couple of rows of laminate down and from there, it gets a bit easier. When we stop, we have about 7 1/2 rows down and it’s starting to look like a floor.
But you can’t guess what we’re doing the next morning. Yup, that’s right, more laminate. It takes most of the day, but the floor is down. It’s really amazing how a bit of paint and floor transforms the room. There’s still a lot of finish trim work to do (casings, baseboards, caulking, etc.) but the downstairs is really starting to feel finished and not like a construction zone.
- Posted by Bob at 10:44:22 in Build
- 85 comments (13804 views)
-


Monday, May 11, 2015
Look up
That’s what we did Saturday. Work started on the the living area ceiling. This is mainly just a clean it up and make it look nice activity, but that makes it sound like less work than it really is. First, the structural elements are primarily make up of 2×10’s running the length of the room. To make these look better than raw 2×10’s, they’re organized into pairs each pair has about 4” gap between them. Then some 1×4 boards are nailed to the bottom to make each pair look like a solid 9×7 wood beam. There are 2 of these 9×7 “beams”. Because they are hollow, it provides a bit of a channel to run wires and mount ceiling fans. The one fan that was over the dinning area was removed months ago, the plan is to reuse that electrical box for a new chandelier so no issue, it works as is. The second ceiling fan location doesn’t work. The fan blades hit the new fireplace sofit so it’s been without fan blades since that sofit was built. It needs to be relocated.
The fan was removed and the “beam” with fan box was opened up. It was pretty easy to pull the wire back out, open up the other beam and re-run the wire. The new fan mount will be centered between the beams and centered on the fireplace to give it some kind of symmetry. The new mount is now ready for the fan to be hung. This task was easy.
By pulling down the bottom of the “beams” and putting them back up, we created a lot of nail holes and caused a lot of previous filler to fall out. Thus, the “beams” now need a lot filler to hide the nails and seams. Not to mention some filler to hide the hole where the old fan once was. Genny spent hours on the ladder filling seams and nail holes.
At some point, someone thought that the transition between the beam and pine ceiling needed molding so there was a nice 1/4 round molding there. It really didn’t improve the look and, in fact, seemed to make it look dated. So it was removed leaving behind a nice thin line of paint on the ceiling, about 1” away from the beams. Getting that off means paint stripper and elbow grease.
In addition to the 1/4 round molding, there was also a sofit that ran around the outside walls. Again, it looks better with this removed but now there’s also a thin line of paint on the ceiling from that.
After one day, most of the paint has been stripped and most of the beams have been filled. That’s one full day of looking up and we’re still not ready to paint the beams.
- Posted by Bob at 13:31:09 in Build
- 3 comments (2479 views)
-